Better Not Be Drawing on the Walls Again
Wall Trim Tips from a Professional person Carpenter
By Robert Robillard
Ane of my favorite finish carpentry activities is to make and install wainscoting. Wainscoting is a broad term referring to trim that is added to the bottom quarter of the wall.
Wainscoting helps raise the construction and design of the room by splitting the wall into two sections and giving the heart a line to follow. When placed at the right level, wainscoting tin can also requite height and presence to a room by elongating the await of the wall or tying in a high ceiling.
Wainscoting functions to give formality and balance to a room. It can as well give a room a textural interest that ordinary, flat painted walls cannot reach.
The term wainscoting really refers to the application of decorative paneling that'southward placed between a baseboard running along the flooring and a chair rail or wainscot cap on the wall. Wainscoting has been effectually for centuries and is a very popular finish trim option in the New England expanse.
Types of Wainscoting
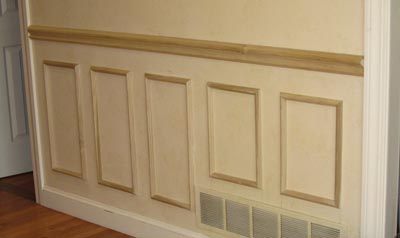
The type of material used for wainscoting can exist wood paneling, cope and stick panels, overlapping boards or practical moldings. Wainscoting can be as elegant and formal as a raised panel, or a simple as a flat console with a chair rail.
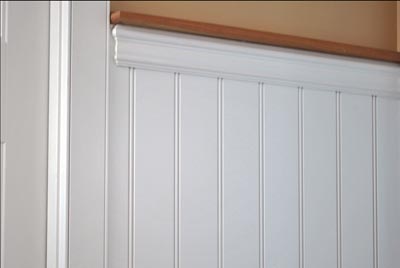
A chair rail is a horizontal molding attached to the wall above the wainscoting. I've never seen wainscoting installed without a chair runway of some sort. The summit of a chair rail typically ranges from 32 to 48 inches above the flooring.
Wainscoting that consists of raised, flat or recessed panels provides a simple, clean look popular in Mission style and Arts and Crafts manner homes.
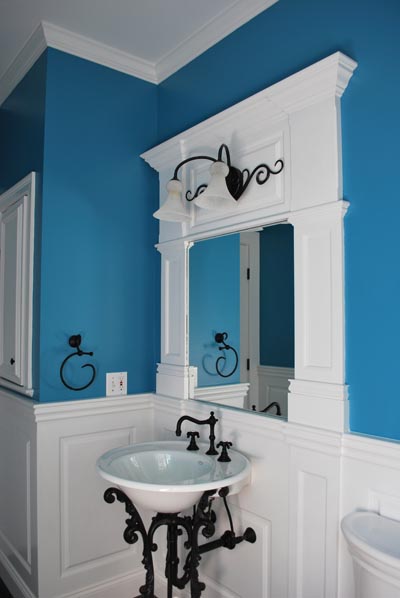
Beadboard wainscoting consists of vertical tongue-and-groove boards that interlock to create vertical lines, as often seen in pantries, cottages or country way homes. This await has go very popular in mudrooms, kitchens and baths.
Oftentimes times you will run across vertical beadboard wainscoting measuring 42 to 72 inches high, especially in dining rooms.
End carpenters and designers have used wainscoting for architectural design and visual appeal since the tardily 1500s. Although at that place is no structural purpose for wainscoting, the extra feature adds contrast and design to the living space.
Wainscoting is commonly painted to match existing trim in a home; still, employing different paint colors and treatments can add character and personality to a habitation's interior. For instance, a raised panel wainscoting gives a room a more formal appearance. Nighttime stained wainscoting adds a masculine touch for a man's room. White painted wainscoting against pastel walls becomes a youthful, feminine combination.
How the wainscoting is designed and finished makes it usable in virtually any room in the house.
And then, in that location is faux wainscoting.
What is Faux Wainscoting?
False wainscoting has recently fabricated its way into today's homes due to its easy installation and cost savings in time and textile. It's a very affordable and interesting solution to bare walls.
Faux wainscoting basically entails attaching moldings to the wall to create the expect and effect of solid wainscoting panels. Faux wainscoting can look as good as the real affair and is toll-effective when compared to solid wainscoting. Either mode, both methods add instant elegance to almost any room.
The goal with installing simulated wainscoting means gluing and securing molding, every bit well as chair rail molding, to create the await of solid wainscoting.
The moldings are mitered to create a foursquare or rectangle, and the wall and moldings are painted 1 color to look like solid wainscot. It'southward basically the process of using moving picture-frame molding to create panels.
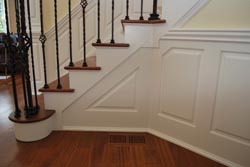
Calculation Wainscoting to a Curved Wall
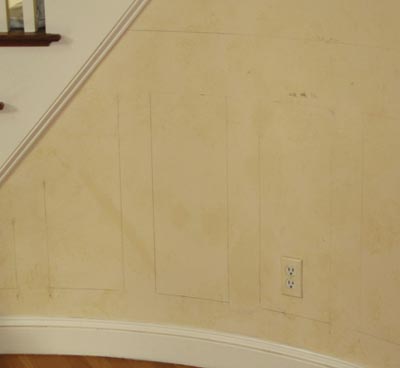
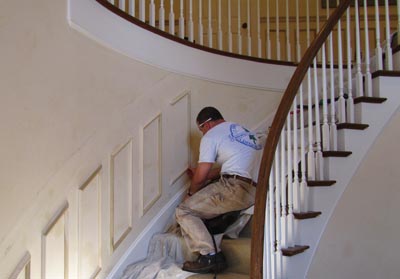
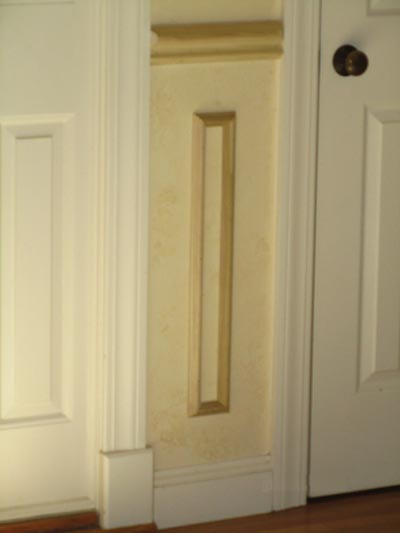
Recently, a friend of mine wanted to dress upwardly the front entryway of his dwelling. A stairway virtually the door had a curved wall that was very bare and rated "apathetic at best" on the interior blueprint scale.
Because of the curves, faux wainscoting was a great solution to add together some instant course to this entryway and also stay within budget. New paint and wallpaper volition dress it upwardly one time finished.
On this job we kept the existing baseboard trim and bought a larger version of the faux molding to utilise as the chair runway.
Later on identifying and procuring the moldings needed, we cut lauan strips to utilize for layout and fabricated an acute-angle jig earlier setting up our laser level to marker the walls.
Materials Needed
- Carpenter's estimator
- Solid wood molding
- Flexible molding
- 1/4″ strips of lauan ply
- Latex Adhesive caulk
- Polyurethane construction adhesive
- Wood glue
- Pneumatic finish and brad nailers, compressor
- Levels, laser level
- Miter saw
- Astute-angle Jig
- Painter'south record
Design and Layout the Panels
For any type of wainscoting to expect proper, the panels must be laid out then that each of them is the same size and equally spaced on the wall. When installing panels on more one wall, this means that different walls may accept a different size and number of panels, depending on the wall'southward length.
Nosotros used a calculator to determine equal spacing of the vertical molding and panels that were pleasing to the eye of the homeowner.
Note: Generally, the lesser rail is taller than the top rail. However, on our project we chose equal spacing on all sides of the faux panels.
To calculate the layout of the panel spacing, e'er begin with an gauge of the panel size, then run your numbers to determine the exact panel number.
Add together your stile measurement to your panel size and carve up the wall's length by your number. Remember that there is always one more stile than there are panels. This is considering the corners should begin and terminate with a stile.
Tip: When laying out the wainscoting, wait around the firm for blueprint clues. I often use the width of vertical stiles on paneled doors for my wainscot vertical panel spacing.
Nosotros purposely laid out the panels so whatsoever switches or outlets would either country on a rail (area between two vertical moldings) or within a faux panel, taking care not to have information technology country too close to the molding's edge.
Once you accept your layout established, I suggest you make a full calibration drawing on the wall to eliminate any confusion and to discover any layout bug.
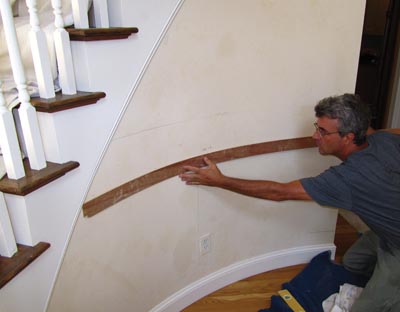
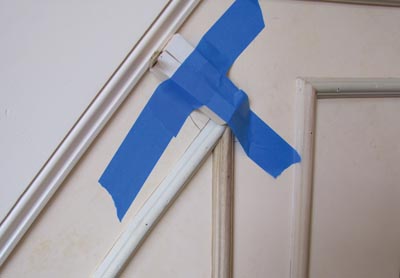
Drawing your Layout on a Curved Wall
We needed a straight edge for drawing our panels and marking the curved wall. We used lauan plywood ripped down to three-in. strips equally a template and tracing fabric. It works amazingly well to measure, mark and lay out the curved wall.
Notation: Lauan plywood is a cheap version of mahogany plywood and comes in a four×viii canvas in 1/8- and ane/4-in. thicknesses. Information technology is very flexible and perfect for curved wall applications.
Nosotros fix upwards 2 laser levels both with horizontal lines and were able to marker the entire rooms top and lesser molding lines, which pinpointed the placement of the lauan we used to guide our cartoon.
On this project the homeowner chose four-in. spacing for everything. We applied this 4-in. measurement for spacing the faux panels from each other, the baseboard and chair runway.
Cut the Molding
The molding tin exist cut easily with standard woodworking tools, and a miter saw works best for cut accurate angles.
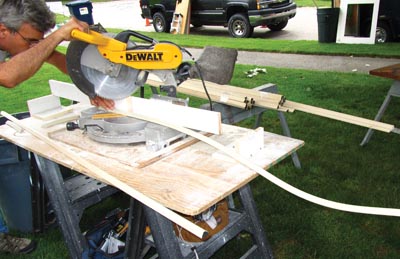
Each wall will take a slightly different "console" size based on the distance between wall corners and door openings. If the math is right, all of the molding for a single wall can be cut at i time, which speeds production.
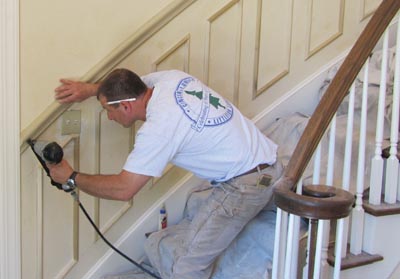
Fasten the Molding
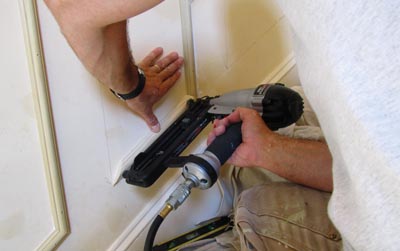
Most of these moldings will non land on a wall stud, and so we needed to glue them to the wall and use end nails to hold the molding in place while the gum dried. We used latex adhesive caulking and polyurethane agglutinative for gluing the molding to the wall.
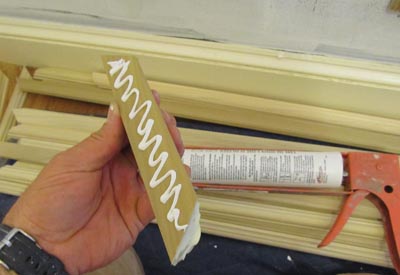
Half-dozen-penny finish nails driven at opposing angles into the dry-wall were installed to cinch the molding tight to the wall while the adhesive set. Molding frame corners were mitered and nailed to each other conventionally with cease or brad nails.
The chair rails molding was installed the aforementioned mode, but considering it spans across wall framing nosotros could fasten them to the studs with terminate nails. On a curved wall, I recommend using the adhesive caulking besides.
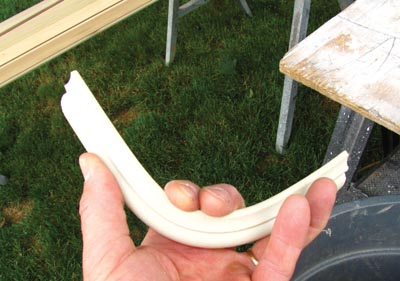
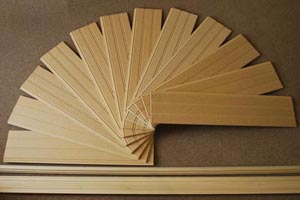
Flexible Molding to the Rescue
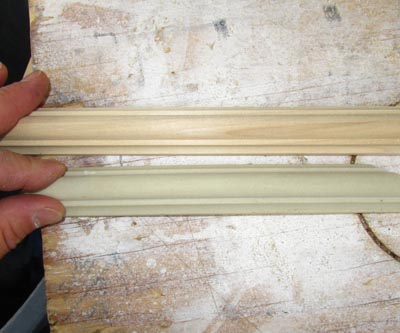
Installing molding to a curved wall meant using Duraflex moldings from ResinArt. These flexible moldings are a simple and economic alternative to curved applications where wood moldings won't work.
It'due south important to choice a flexible molding that also matches the solid molding. We chose an astragal mode molding for this projection. The moldings come in a box, in ten-ft. sections. When I compared the flexible molding to the wood molding they were nearly identical.
The flexible molding has the advent of real wood and installs with standard woodworking equipment. It cuts, sands, shapes and finishes like woods. When cutting these flexible moldings, take care to provide additional support. If not, the molding flops and bends, which can affect the quality of the miter cut.

Since the flexible molding costs 3 times that of the wood, I used the wood on all of the vertical molding pieces on the curved wall.
I used polyurethane construction adhesive to glue the flexible moldings to the walls, and agglutinative latex caulk for the wood. Both types of moldings were also secured with a pneumatic 16-gauge cease nailer.

Tip: Bulldoze the finish nails at dissimilar opposing angles for ameliorate holding power. The bending holds the drywall or plaster better than installing the nail straight into the wall.

Flexible molding can besides be used on half-round windows, elliptical windows, arches, arcs, radius drywall corners, circular columns and more.
Pigment and Caulk
After installing the moldings, use caulking to all the seams.
If you want to brand the faux wainscoting await like solid wainscoting, and so paint the wall from the chair runway down a color that differs from the upper portion of the wall. Some folks also pigment the panel interiors dissimilar colors for a more than dramatic wait.
Editor's Annotation: Robert Robillard is editor of A Concord Carpenter and main of a full service carpentry and remodeling business located in Hold, Massachusetts. Visit www.aconcordcarpenter.com.
Side Note 1
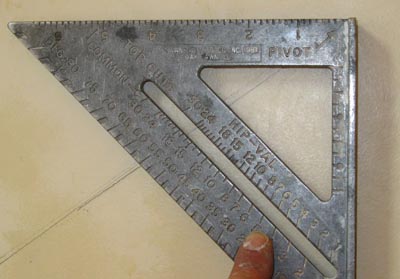
Astute-Angle Jig
There are many times when I need cut trim or molding at an angle greater than my miter saw is designed for. Most miter saws cut to 45 degrees or slightly larger, usually 50 degrees.
Simply what if you demand to cutting 55 degrees or greater? One very unsafe way is to concur the slice to be cut perpendicular to the saw'south fence and freehand this cut. I practise non recommend cutting trim this way.
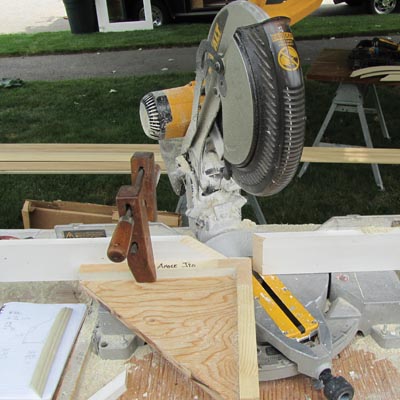
A safer solution is to make an acute-angle cutting jig and continue it with your saw.
I made this ane out of scrap wood, and it creates a new fence perpendicular to the saw'southward fence, which gives you greater control when cutting the sharp angle.
I arbitrarily chose 12-by-12 inches for the jig. I cut a 12-in. square of
3/4-in. plywood and so cutting it diagonally to make a brace for the jig.
Fleck five/4 trim makes upwards the edges. I chose five/4 sides considering the raised edges give me plenty of space to clamp or screw the jig. I screwed the parts together at 90 degrees, and then I clamped the jig to my saw argue.
Tip: Have scrap material on manus to practice using this jig and to aid decide the correct miters.
Side Note 2
Custom Manufactured Spiral Stairs
 Goddard Manufacturing specializes in custom designed, handcrafted screw staircases built to your specifications. Cull from several different styles of spiral stairs to fit almost whatsoever application, and the professional craftsmen at Goddard will try to create the design you lot desire. To get the virtually strength, cleanest line, and all-time looking screw stairs possible, the staircase needs to exist welded into one solid construction and is usually shipped as 1 piece. (Wood spiral staircases are disassembled and boxed for aircraft). If the expanse is ready for the spiral stairs to be installed, two people tin ordinarily install it in less than an hr. The All Wood Spiral Staircase is shipped disassembled and takes 4 to half-dozen hours to reassemble. For more than information, visit www.spiral-staircases.com or call 1-800-536-4341.
Side Note 3
Wainscoting Resources
WainscotingAmerica.com is a great source for ordering wainscoting panels online in minutes. The company has advanced manufacturing techniques that allow information technology to brand custom circuitous panels very efficiently, delivering premium wainscoting at affordable prices that ship in 5 business organization days. The company offers a 1-piece MDF custom wainscoting panel up to ix feet with no seams. The innovative online design system allows DIY customers to pattern and club circuitous custom panels without the need for an expensive carpenter. The design tool will automatically attempt to determine the optimal number of inner panels for a given panel size. It uses the aureate ratio of 1.618, which is the height of the panel to the width of the inner console. There are books written virtually the gilt ratio, how it is found in nature and that the Egyptians and Greeks used it in their ancient architecture. Most of the literature on the golden ratio states that rectangles with this ratio are more than highly-seasoned to the human heart. Nonetheless, you can modify the design as yous see fit. Visit www.WainscotingAmerica.com.
AmericanBeadboard.com is an online source for loftier-demand beadboard wainscoting. The reasonably priced beadboard panels are cut from 5/viii-in. thick premium MDF and will ship in three to iv concern days. A 36-in. tall viii-ft. kit starts at just $119. Visit world wide web.AmericanBeadboard.com.
Other Wainscoting Articles
- Installing Wainscot in a Pulverisation Bathroom
- Adding Way with Wainscoting
- How to Install Wainscoting
newdegateandareat83.blogspot.com
Source: https://extremehowto.com/wainscoting-tips-from-a-pro/
0 Response to "Better Not Be Drawing on the Walls Again"
Post a Comment